
Sunday, July 10, 2011
Temple guard
Another angle

Last sauri unit

Monday, July 4, 2011


Sunday, July 3, 2011
Krox

Friday, July 1, 2011


Wednesday, June 22, 2011
Cleansed tongues

Tuesday, June 21, 2011
The last of the Mohicans

Monday, June 20, 2011
Sauri base

Sunday, June 19, 2011
Getting efficiently lazy
Now that I can post from my phone, I don't have to go downstairs to post! Incredible stuff.
A Few More
 This model was super easy. I tried to tie him in with the Temple Guard I will be doing. I have yet to decide what his shield will look like.
  The Kroxigor are great. I really can't stand the skinny one in the back from a previous version. It really doesn't matter because he was free like the others. It won't take me much time to complete their bases.
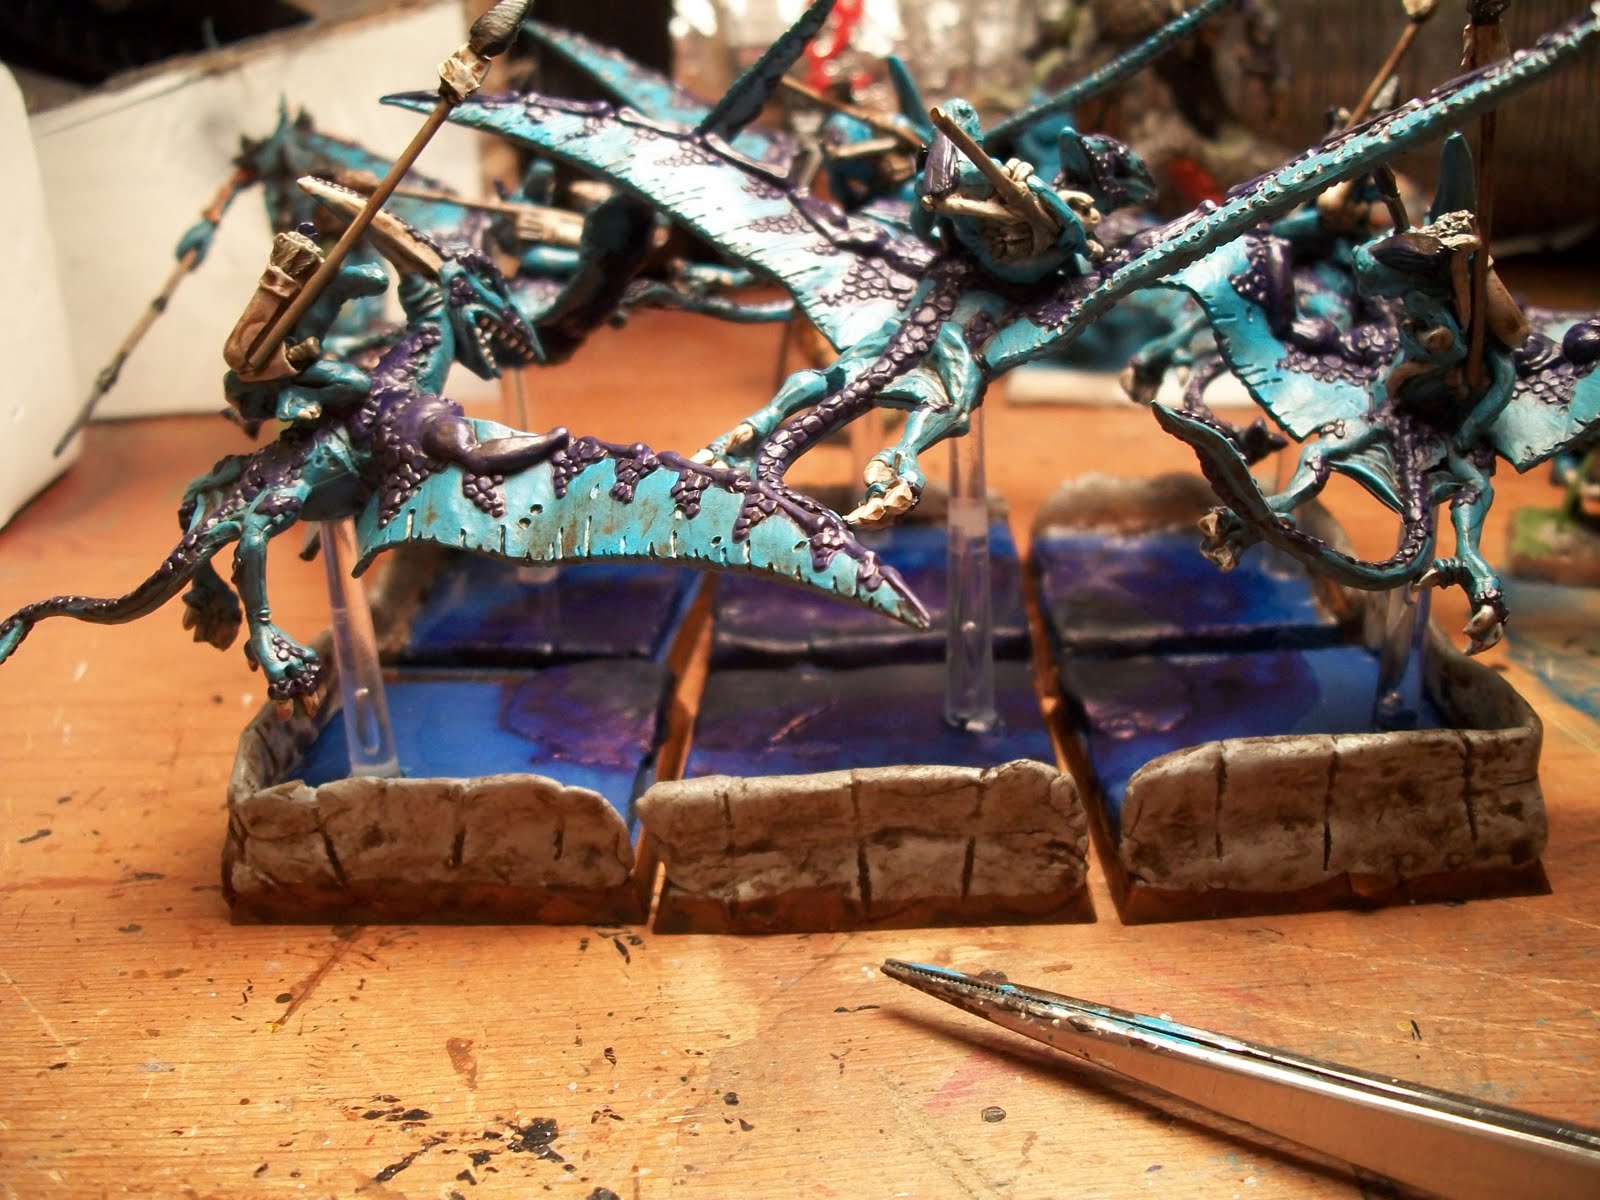 These Terradons finished the total I have. I had to really bend and shape them at the right angle so they could fit. Too bad I don't have more.
 I'm still working to complete the 40 odd Sauri in two units with spears. I'm going to finish them this week and the next.
Tuesday, May 24, 2011
Finished Products
 This is the finished product for the Terradons. I have three more terradons that will complete the backside of the pool.
 This unit above is my first unit of hand weapon and shield Sauri. Both units have 20 models each. I still have a few left over that I am not for sure what I will do with. Each unit has a themed base that all fit in their places every time. I am always tired of having to reposition models to make them fit in a unit. This takes care of that immediately.
  I'm really happy with how this unit's base came out. My wife made them and it is very 3-D.
  The last model in the rear is a character. His Cold One fits in to the rear and will also replace the standard model. It all depends on what I will be doing with the unit. I'm really happy with the final product. I'll try posting pictures of the Sauri bases later today if I have time. Enjoy!
Saturday, May 14, 2011
Finally
These three beauties were done just recently. I will base them in a pool or spawning setting. I look forward to posting those pictures.
 The top most picture is the Temple Guard Standard after being inked. I will take a picture of him after he's had a few highlights.
 The picture below is after being initially painted and after being gloss varnished. I've seen this technique done to increase the flow of any wash. It definitely helped and will continue doing this to the rest of the Temple Guard.
 Below is the base colors before being varnished. I really like the vallejo gloss varnish. I applied it with my airbrush, waited for 25 minutes, then washed the entire model. Super easy!
Saturday, April 30, 2011
Temple Guard

Great start today! I had this standard based for quite a while. I have yet to touch the base but it will come in time. I'll post the pictures here because there ain't another soul who watches this as of yet.
We shall see
Well the wheel of time weaves as it wills. I seem to have jumped forward into the technology and will see if I can start posting information from my phone. Laziness is next to godliness.
Sunday, April 24, 2011
Next 4 Saurus Cav

I had the back four started and completed recently. While I was making them I realized I needed to skip a few bases since I don't have 18 total cavalry models! Needless to say the back looks a little more spaced out.
Sunday, April 17, 2011
Lizard Cav complete
Well another great day. The wife gave me some time to work on the models I've been itching to complete. These models were some of the first to get a secondary color applied to the models without any major issues. I have yet glued their shields on to them. I'm still very leary about paint clogging the nozzle but if it stays clean I don't have to worry about anything!  Above is the look at what they were before I put the dip onto the models. Below you can see what they came out to be. I'll be looking to try to complete the rest of the unit so we can have a full cavalry horde.

Above is the look at what they were before I put the dip onto the models. Below you can see what they came out to be. I'll be looking to try to complete the rest of the unit so we can have a full cavalry horde.
Friday, April 15, 2011
Wednesday, April 13, 2011
Instant Mold
I talked about it on Thinker's plog but I was set to finish a whole unit of saurus cavalry. I was baffled by the horrible spray splatter that completely ruined the day. I figured out the issue so I'm back in business. Just can't seem to forgive myself for letting that much crud build up! What I did find was a gem, Instant Mold from Cool Mini Or Not dot com. I'm going to have to try this out and let you all know. If you are interested there is a great youtube video link here: http://www.youtube.com/watch?v=ub70AU5RfmI&feature=player_embedded 
Saturday, April 9, 2011
Next Skink lot
Just finished the 33 Skink I have been working on. I only have a handful left and then will start in on other units. See the entire lot I've painted below.
 .
. Wednesday, April 6, 2011
Paint comparison chart
DakkaDakka has a superb chart I am thuroughly impressed with. Here's the link, I'll add it to the very top of the forums and blogs section. http://www.dakkadakka.com/wiki/en/Paint_Range_Compatibility_Chart
Tuesday, April 5, 2011
Skink Base
Folks, really easy. I can do about a base a minute. The DAS putty, the random tool that i push down on the putty with, and of course bases are all you need to complete. The biggest issue I always find with DAS is that it is not sticky except to itself. The second issue I have with it is that it's a race against time. If you pull too much out of the bag you will have it dry out on you before you have completed all your bases. The key here is to gingerly squish the small bit of DAS you have on each base, push it down with the tool, and then ensure it hasn't moved or shifted to much before letting it dry.  I pull a little bit out in the size of a one inch ball and then tear bits off for each base.
 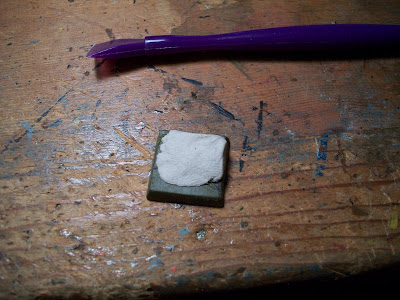 Like I said before, this takes about a minute a skink base and pretty soon they will all be done.
 I hope that all made sense. Just keep it simple and don't worry about making mistakes because there will always be a way to cover it up later.
I pull a little bit out in the size of a one inch ball and then tear bits off for each base. Like I said before, this takes about a minute a skink base and pretty soon they will all be done. Skink lot work
These are the latest batch to be complete. I will be working to post a few pictures on how I base them. Soon we'll be done completely with the skink and skink related models. Afterwards, I will be working on the Saurus lots I have. You can see that I have a lot to complete. What isn't in the picture is the Stegadon, and several Terradons I have waiting to be started too. All of these models were airbrushed with White Primer and then Ice Blue from Vallejo Game Colors.


This is the pre-dipped stage. I have painted Khemri Brown, Deneb Stone, Mordian Blue and Chaos Black all from GW Paints on to the base coats.
Each model is dipped in a wide mouth mixture of 1 part water and 1 part water based wood stain from a local diy store. Very easy and a lot cheaper than buying the stuff at GW or any other hobby store. I use a cheap water color brush to "pull" the excess stain off the model.
I allow the models to dry at least 2 1/2 hours. It varies upon the model but I usually don't want to touch them until the are 100% dry. I liken this step to a varnish. It really completes my models and I have yet to spray any varnish over them. Thankfully they dry with minimal shine and I like the look so far.
Sunday, April 3, 2011
Vampire Dragon

I have been working a long time on Zacharias' dragon. I decided to make him an asian dragon without wings. I wanted his body curving and snaking and then I created a swirling "Soul Pull" coming from the ground and into the dragon's left arm.
Get them magnetized first
This is what I used to get the magnets together. I like to use a sheet of 12-14 gauge sheet steel from the local hardware store. I like to cut all the magnets using the base. Seeing as most of these bases have slots I have to cut the square from the magnet strip and then cut one more time at an angle to fit between the slot.
 I then tear piece of paper off the backing of the magnet.
 Liberally put the 527 glue on the base.
  Squish the magnets into the base.
 Then just let them sit for a few hours; this will ensure they can be moved around and based.
I like to cut all the magnets using the base. Seeing as most of these bases have slots I have to cut the square from the magnet strip and then cut one more time at an angle to fit between the slot. I then tear piece of paper off the backing of the magnet. Liberally put the 527 glue on the base. Squish the magnets into the base. A stop for a show


SO the pictures above are showing how I've decided to create my spray booth from Cardboard, cheap furnace filters, Airking vent fan, 4" duct, and wood. Most of this was created so I could break it down and move it. I don't have the luxury of knowing that the house I live in this year will be the same next. Enjoy!
Saturday, April 2, 2011
Feverish
Working hard to finally post a few pics on how I put a base together for my Lizzies. On a side note, I found a wonderful new blog by a bloke from England. I'll be adding "Bleaseworld" to the list for sure.
Monday, March 28, 2011
Get it done
The fact I received the spray paint gun and compressor means not a lot. What does matter is that I have zero air flow moving away from my face! Always plan out your goods to ensure you can actually use them when you get them. Lizardmen are going well. Finished 75 skinks and will be working furiously to complete the Saurus in record time. With the help of a spray gun, it will go even faster. Look forward to it with much anticipation. How do you quantify an airbrush? Is it the amount of time saved, the quality of paint laid on the model, or is it just the amount of money saved from all those aerosol cans? Either way, it was a great buy.
Sunday, March 13, 2011
Booth Makeup
Well another short update. Not knowing what we'll be getting in to with the budget battle I'll wait to buy anything new until it works itself out. Here is a great cheap product to make an airbrush booth. http://sketchup.google.com/3dwarehouse/details?mid=b531ede7ae9638751211856323403f6a
Saturday, March 12, 2011
To Airbrush or Not to Airbrush

Well folks, I believe the wife and I agreed that I can invest in an airbrush. Not having to go to Walmart anymore for those cheap cans will be great. Being able to complete models faster will be even better! I added a few links to VOODOO and to a youtube link that shows how awesome you can get your colors to look. Trying to finish mega numbers of models will have the time decreased, hopefully.
Saturday, March 5, 2011
Book tabs

Folks, if you've ever wondered why you can't find the right spot in your book; it's probably because you didn't put tabs down.
Simple fix: just cut up some index card and use some tape. Ta-DA! it's done
Friday, March 4, 2011
Move
Moving, just can't seem to find the time to do much else. Being gone from the game was tuff! What I have learned in that time is being able to manage the time. What makes it even tougher is knowing that the Wife will always be more important than the models. Look forward to getting a lot done soon and starting to post plenty of pictures with the progress.
Subscribe to:
Posts (Atom)