Wednesday, April 6, 2011
Paint comparison chart
DakkaDakka has a superb chart I am thuroughly impressed with. Here's the link, I'll add it to the very top of the forums and blogs section. http://www.dakkadakka.com/wiki/en/Paint_Range_Compatibility_Chart

Tuesday, April 5, 2011
Skink Base
Folks, really easy. I can do about a base a minute. The DAS putty, the random tool that i push down on the putty with, and of course bases are all you need to complete. The biggest issue I always find with DAS is that it is not sticky except to itself. The second issue I have with it is that it's a race against time. If you pull too much out of the bag you will have it dry out on you before you have completed all your bases. The key here is to gingerly squish the small bit of DAS you have on each base, push it down with the tool, and then ensure it hasn't moved or shifted to much before letting it dry.  I pull a little bit out in the size of a one inch ball and then tear bits off for each base.
 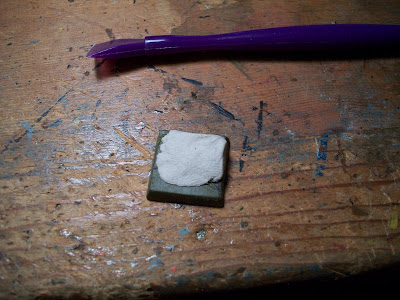 Like I said before, this takes about a minute a skink base and pretty soon they will all be done.
 I hope that all made sense. Just keep it simple and don't worry about making mistakes because there will always be a way to cover it up later.
I pull a little bit out in the size of a one inch ball and then tear bits off for each base. Like I said before, this takes about a minute a skink base and pretty soon they will all be done. Skink lot work
These are the latest batch to be complete. I will be working to post a few pictures on how I base them. Soon we'll be done completely with the skink and skink related models. Afterwards, I will be working on the Saurus lots I have. You can see that I have a lot to complete. What isn't in the picture is the Stegadon, and several Terradons I have waiting to be started too. All of these models were airbrushed with White Primer and then Ice Blue from Vallejo Game Colors.


This is the pre-dipped stage. I have painted Khemri Brown, Deneb Stone, Mordian Blue and Chaos Black all from GW Paints on to the base coats.
Each model is dipped in a wide mouth mixture of 1 part water and 1 part water based wood stain from a local diy store. Very easy and a lot cheaper than buying the stuff at GW or any other hobby store. I use a cheap water color brush to "pull" the excess stain off the model.
I allow the models to dry at least 2 1/2 hours. It varies upon the model but I usually don't want to touch them until the are 100% dry. I liken this step to a varnish. It really completes my models and I have yet to spray any varnish over them. Thankfully they dry with minimal shine and I like the look so far.
Sunday, April 3, 2011
Vampire Dragon

I have been working a long time on Zacharias' dragon. I decided to make him an asian dragon without wings. I wanted his body curving and snaking and then I created a swirling "Soul Pull" coming from the ground and into the dragon's left arm.
Get them magnetized first
This is what I used to get the magnets together. I like to use a sheet of 12-14 gauge sheet steel from the local hardware store. I like to cut all the magnets using the base. Seeing as most of these bases have slots I have to cut the square from the magnet strip and then cut one more time at an angle to fit between the slot.
 I then tear piece of paper off the backing of the magnet.
 Liberally put the 527 glue on the base.
  Squish the magnets into the base.
 Then just let them sit for a few hours; this will ensure they can be moved around and based.
I like to cut all the magnets using the base. Seeing as most of these bases have slots I have to cut the square from the magnet strip and then cut one more time at an angle to fit between the slot. I then tear piece of paper off the backing of the magnet. Liberally put the 527 glue on the base. Squish the magnets into the base.
Subscribe to:
Posts (Atom)